This article is intended for informational purposes only and provides a general overview of how to setup, maintain, and remove a single shoulder closure on the highway. This is a great place to start in learning how to safely and effectively set a traffic control pattern, because many elements in this setup are similar to more complex types of roadway closures.
If you are uncomfortable working around live lanes of traffic, or don’t have the necessary skills, equipment, or certification to perform this type of traffic control setup, you should hire a qualified traffic control company to do the work.
Overview
The simplest type of traffic control pattern to setup, maintain, and remove is the single shoulder closure. This closure—while easy to accomplish for even the most novice road worker—still contains similar elements of other, more complex, types of closures.
In fact, the order of setup and removal for a shoulder closure and the safety procedures involved are almost identical, which makes this a good starting point for learning how to safely and effectively set a traffic control pattern.
For this example, we will be using the federal guidelines found in Part 6 (pdf pages 87 and 97) of the federal 2009 Manual on Uniform Traffic Control Devices (MUTCD).
The requirements for your state or local area may differ significantly from the federal guidelines. Therefore, make sure to review your state’s regulations, before attempting to set this type of closure in your area.
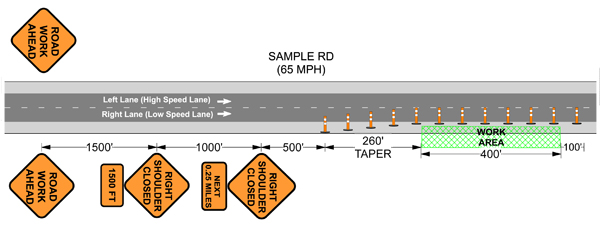
Example Area
In this example, we will be setting a shoulder closure on the right side (low-speed side) of a 65 MPH two-lane highway with 12′ wide lanes. The traffic engineer will allow this closure from 9 a.m. to 3:30 p.m., and 7 p.m. to 5 a.m., Monday through Friday; and 24 hours during weekend hours (Friday 7 p.m. to Monday 5 a.m.). There are no additional requirements in this example to reduce the work zone speed limit, use a crash cushion, hire a Law Enforcement Officer, or to give advance notice to the public before starting work.
Personal Protection Equipment
All personnel involved in setting up any closure should wear a minimum of the following:
- Lime-Color Type III Safety Vest
- MSA Approved Hard Hat
- Steel-Toe Work Boots
- Work Gloves
- Work Shirt & Work Pants
- Eye Protection
Traffic Control Equipment
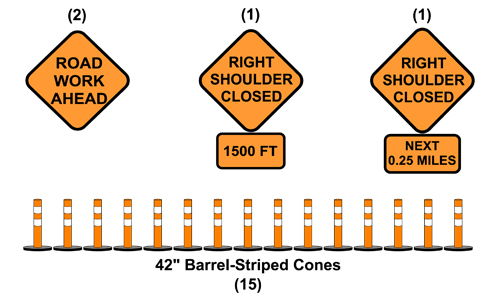
- All signs 48″ x 48″ retro-reflective
- Four (4) sign stands for short-term projects lasting less than 3 continuous days of operation
- Eight (8) permanently installed sign posts will be required for long-term projects lasting more than 3 continuous days of operation
- Amber Flashing Lights attached to each sign are required for nighttime operation
Work Vehicles
- Highly visible work vehicle equiped with amber warning lights
- Work vehicle equiped with crash cushion and flashing caution sign (if required)
- Law Enforcement Officer in patrol vehicle (if required)
Personnel
Two workers minimum are required for this setup. One worker will drive the truck and one will drop or pickup cones. Both workers can share the workload while setting up and taking down signs and stands. Although a single worker can set and remove this type of closure, TTCP Express always recommends using a buddy system for all traffic control work.
It is always more efficient and safer to use two workers, rather than one.
Layout
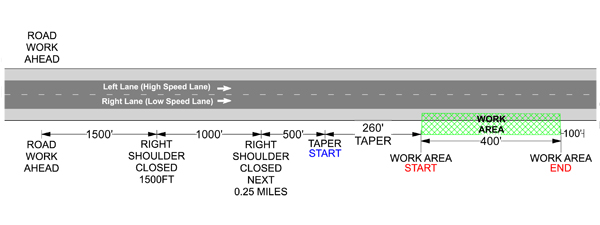
The first step in setting a shoulder closure is to determine the starting point and end point of the WORK AREA. The work area is the total amount of space on the shoulder that needs to be shielded from traffic and includes where the actual work will occur and also adequate space for equipment and construction vehicles. Once the work area parameters are established, you then use the WORK AREA START and measure backwards in order to determine the layout for the TAPER and ADVANCE WARNING SIGNS.
Setup – Step 1 – Place First Sign
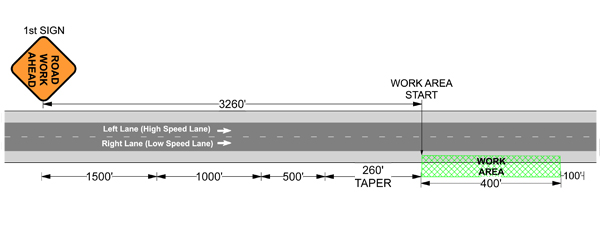
After determining the WORK AREA START, the 1st Sign, ROAD WORK AHEAD, will be placed on the Left Lane Shoulder (High Speed Side) 3,260′ back from the start of the work area. This measurement is found by adding together the following distances: 260′ TAPER + 500′ + 1,000′ + 1,500′ = 3,260′.
It is important to place this sign first, and then drive back around to the opposite side of the road by either using turn-arounds, or on and off ramps, in order to place the second sign.
Never attempt to walk or run across live-lanes of traffic to set your signs, because this can result in injury if you trip or fall while in traffic, or lead to an accident by unnecesarily causing motorists to panic upon seeing someone appear in front of them in the roadway.
Setup – Step 2 – Place Second Sign
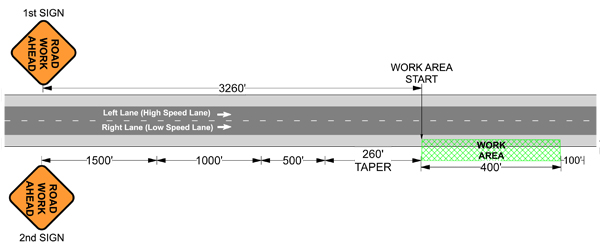
The next sign, another ROAD WORK AHEAD, is then placed opposite the first Road Work Ahead sign on the Low-Speed Shoulder with the same 3,260′ distance back from the WORK AREA START.
Setup – Step 3 – Place Third Sign
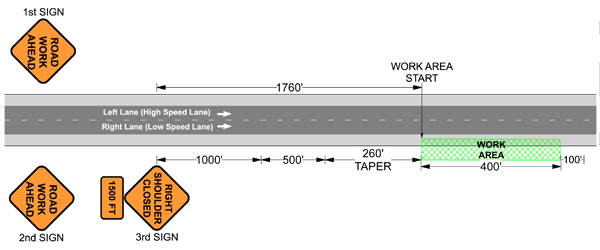
The RIGHT SHOULDER CLOSED sign with 1,500 FT plate is then placed 1,760′ back from the WORK AREA START. This measurment is found by adding together the following distances: 260′ TAPER + 500′ + 1,000′ = 1,760′. The 1,500 FT plate is in reference the start of the TAPER, which is the first piece of traffic control equipment motorists will encounter that is not a sign.
Setup – Step 4 – Place Fourth Sign

The last sign, RIGHT SHOULDER CLOSED with NEXT 0.25 MILES plate, is placed 760′ back from theWORK AREA START. This measurment is found by adding together the following distances: 260′ TAPER + 500′ = 760′.
The “0.25 MILES” listed on the attached plate is found by adding the distances from this RIGHT SHOULDER CLOSED sign to the end of the BUFFER SPACE and then dividing by the number of feet in one mile, which is: 500′ + 260′ TAPER + 400′ WORK AREA + 100′ BUFFER SPACE = 1,260′ divided by 5,280′ (one mile) = .239 miles, rounded to 0.25 MILES for our distance plate.
Setup – Step 5 – Set 260′ TAPER
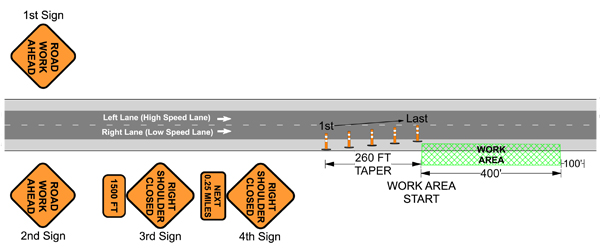
Once all of the ADVANCE WARNING SIGNS are in place, it’s time to set the TAPER, which begins 260′ back from the WORK AREA START. The 1st cone of the taper is placed on the furthest edge of the shoulder away from the highway. Then, each following cone is spaced 40′ apart along a diagonal from the 1st cone to the LAST cone, which is placed on the innermost edge of the shoulder, but not encroaching onto the highway surface in any way.
An old highwayman’s trick for spacing cones is to place one for every dash on the road. This will space the cones approximately 40′ apart in the taper. Otherwise, use a measuring wheel to space the cones the same 40′ distance.
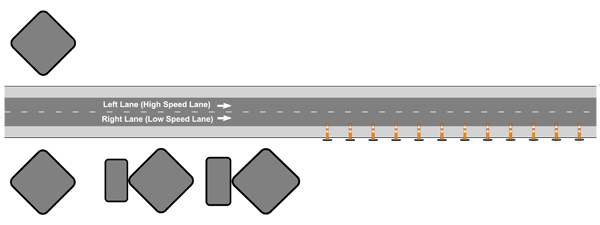
Setup – Step 6 – Finish Setting Zone

The last step in the setup process is to spread the rest of the cones in front of the WORK AREA.
Our example WORK AREA is 400′ in length, but it is advisable, and often required, to extend the cones at least 100′ or more beyond the work area in order to create a BUFFER SPACE.
The cone spacing in front of the WORK AREA should be approximately 40′ between cones to provide a highly visible barrier between motorists and the WORK AREA, although longer spacings of 60′ to 80′ are often permitted.
All cones are placed in a straight line along the innermost edge of the shoulder next to the highway, but not encroaching onto the roadway surface in any way.
Maintain Traffic Control Pattern
Now that the shoulder closure is setup, it’s time to maintain the zone.
The first step in maintaining a traffic control pattern is to go back and drive through the zone on the highway from start-to-finish to double check that everything is in the correct position and to get a motorists-eye-view of how traffic is flowing.
Once you are satisfied with the zone, it is important to periodically re-check it to make sure nothing has been displaced. To do this, visually inspect that all signs and cones are in the proper place according to the plan, and fix any issues that could arise such as a knocked over cone or a downed sign as soon as you are aware of the problem.
Assigning a worker to watch over the zone throughout its operation helps protect not only the workers, but also motorists on the highway—and is a good workzone practice. Many states are now requiring the use of a work zone log book that must be updated with regular checks of all traffic control equipment.
Remove Traffic Control Pattern

Once all work on the shoulder has been completed, or it’s time to pack it in for the day, the shoulder closure must now be removed. The order of removal is almost identical to the reverse of setup, except for how theADVANCE WARNING SIGNS are taken down. Using our numbered example plan (above), the process is as follows:
Removal – Step 1 – Remove all vehicles, equipment, and personnel from the WORK AREA.
Removal – Step 2 – Pickup the cones in the reverse order from the setup.
Removal – Step 3 – Use turn-arounds, or on ramps and off ramps, to come back around to the ADVANCE WARNING SIGNS on the right lane, low-speed shoulder first and takedown the ROAD WORK AHEAD (3) and two RIGHT SHOULDER CLOSED (4 & 5) signs and stands. The work truck could also back up along the shoulder to pickup the signs in a 5, 4, and 3 order, but, considering the long distances between signs, it is usually quicker and safer to pick them up in a forward driving 3, 4, and 5 order.
Removal – Step 4 – Use turn-arounds, or ramps, to come back for the remaining ROAD WORK AHEAD (6) sign and stand on the left lane, high-speed shoulder.
Off-Shoulder Equipment Storage
If the closure is only being removed from the shoulder due to a shutdown in work that will resume later, cones are often allowed to be moved off the edge of the shoulder away from the roadway for temporary storage in order to make it easier to set the zone up again for continued work.
All ADVANCE WARNING SIGNS must then be completly covered (long-term), or moved along with corresponding stands (short-term) to the grassy area just beyond the shoulder with the signs laying face-down.
Vehicles and construction equipment are normally required to be moved 30′, or more, away from the shoulder and surrounded by cones for temporary storage. If the required amount of space is unavailable, all vehicles and construction equipment must then be completly removed from the area to avoid fines.
Never leave anything on the shoulder that could prevent motorists from using the shoulder, or that could cause damage to vehicles if a collision occurs when the zone is no longer active.
Conclusion
As you can see, even a very simple type of closure has many steps and procedures that must be followed in a precise order to safely setup, maintain, and remove. Don’t let this scare you though, a single-shoulder closure is fairly easy to master. Once you understand the mechanics behind this type of closure, you will have many of the same basic concepts for other closures already under your belt.
If you would like to learn more about traffic control, or even making traffic control setups a larger part of your company’s skill set, TTCP Express highly recommends getting certification first through the American Traffic Safety Services Association (ATTSA).