Save time and work safer by using color-coded Step-By-Step Numbered Plans.
TTCP Express can add step-by-step numbering to any plan that you order for an additional $25. This unique feature covers both the setup and take-down procedures for each traffic control plan. It also allows you to coordinate separate crews on a job by giving each team a section of the plan to setup or remove in the proper order.
Our numbered plans provide an excellent value for customers who may have limited experience setting up traffic control patterns. Or, for companies whose workers have differing skill levels and need a better map covering the start-to-finish procedures necessary to get everyone on the same page. It’s also a great way to hone your skills by learning the correct way to set a zone—valuable information that will help you with all future setups.
Set Your Traffic Control Pattern Like A Pro
The most important initial part of traffic control is the plan itself, which details the roadway, type of traffic control, necessary equipment, and spacing. But it can sometimes be difficult, without a lot of experience, to figure out where to start setting the pattern and then what areas of the plan to move onto next.
In a city environment, for example, many workers have a tendency to set the road closure with barricades first, and then setup advance signs, lane closures, and detour routes last, because they want the construction crew to get started as soon as possible. Setting a traffic pattern like this, in the wrong order, is a costly mistake for many reasons that includes: causing unnecessary traffic backups, motorist and pedestrian confusion, putting workers at risk, accidents. This also makes setting other parts of the traffic control pattern more dangerous and time consuming, because workers are now fighting against traffic instead of controlling it.
Therefore, always have an approved traffic control plan, and then know the correct order of setup and take-down procedures before attempting to set or remove a pattern.
With step-by-step numbering, TTCP Express takes care of any guess work for you so that you will be able to efficiently and confidently set or remove traffic control patterns like a pro, saving you a lot of confusion and head scratching while working around live traffic lanes.
Below is a list of the important features found in all TTCP Express Step-By-Step Numbered Plans:
Numbering
TTCP Express numbers plans in order from start to finish. This means that detour routes and advance signs will be setup before lane and road closures in order to keep traffic under control and moving safely through the pattern at all times.
We also determine the most efficient way to set the pattern by minimizing the number of turnarounds and backing up that will be needed, without compromising safety, in order to decrease the total amount of time required for setup or removal.
Color Coding
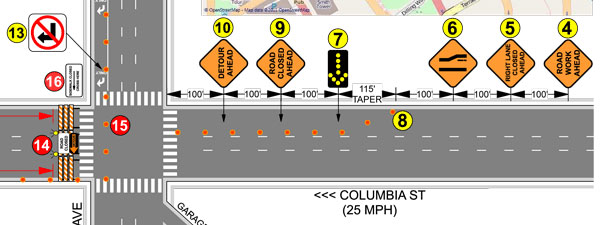
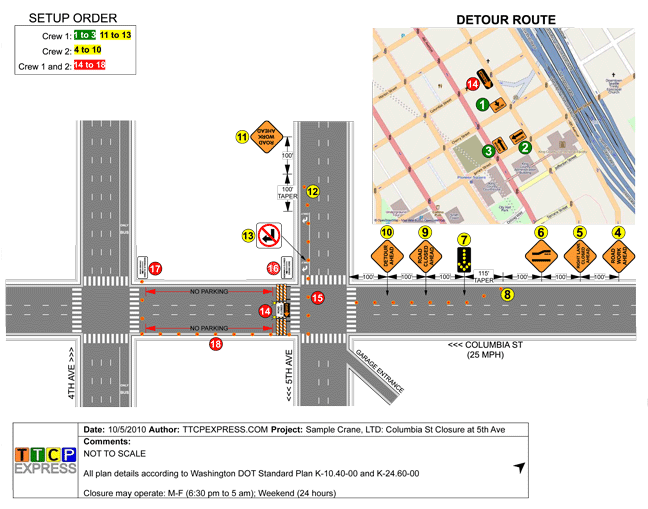
Our step-by-step plans make use of color coding to provide even more detail in showing workers at a glance which areas need to be set first, middle and last for all sections of the pattern. To do this, TTCP Express uses green for areas such as detour routes and some advance warning signs, yellow for advance signs and corresponding lane closures, and red for critical areas closer to the the work area like barricades that need to be set last.
Crew Designations
We number our plans based upon a single crew setting or removing the pattern first, and can then add in designations for splitting the work up into multiple crews afterwards by assigning a range of numbers corresponding to the work each crew will perform.
TTCP Express can add in as many crews as you need to your plan to make setting up your pattern as safe and efficient as possible.